Posting AVC-HD Files to YouTube Using VideoReDo
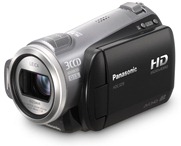
 A few years ago we bought a wonderful HD camera. The Panasonic HDC-SD9 camera has been a slam dunk success in our family. By adding an 8GB SD card, the camera has ample storage to go with its excellent battery, size, and picture quality.
The big problem with this camera is handling the videos once one has completed recording. Panasonic bundles the camera with some of the worst software known to man, however the best way to handle the videos is to ignore that bundled software and use other products.
In another post I’ll discuss handling the files (I just use Windows Explorer), but the focus here is getting Panasonic and Sony’s .mts files up to YouTube. One way to prepare these files is with Windows Live Movie Maker. However Microsoft has oversimplified that product to the point that it is difficult to use. The best product, easily, is VideoReDo because of its blazing fast speed as well as versatile, easy to use settings.
VideoReDo has two modes: Cuts and Scene. Essentially the user picks whether they want to throw away the selected scenes or keep the selected scenes. To me it makes more sense to keep selected scenes, so I use Scene Mode. (This is selected thru Tools | Options… | General Parameters | Editing Mode)
Once a video is edited one has to pick a codec that is compatible with YouTube. While there is a growing list of compatible formats with YouTube, I’ve only found one that works reliably for HD video. The way to select it is to do the following once editing is complete:
- Select “Save As…â€
- Type a filename and location
- In the “Save As Type…†box, select MPEG2 Program Stream (*.mpg)
- Select the “Options†button
- In the Video section of the dialogue box, select the “>†button to the right of the resolution numbers, and select “1280×720†in the list.
- In the Header Bitrate section, select 10000 from the pulldown menu
- In Max Bitrate, select “9500 (DVD)â€
- To save time in the future, click the “Save as New Profile†box at the bottom, then rename this setting in the top box to something like “YouTube Uploadâ€
- Select “OKâ€, then Save to save the file.
VideoRedo will spend a few minutes transcoding the video, but when it is complete, open your YouTube profile page and select “Upload†at the top. Navigate to your saved video, and begin the process of uploading the video. The result should be an “HD†video that is easily navigable.
There are three levels of VideoReDo
- VideoReDo Plus ($50)
- VideoReDo Suite Version 3 ($75)
- VideoReDo Suite with H.264 ($100)
I believe that the $50 product will do the task at hand, but honestly, I do not know. Being an avid Windows Media Center 7, Android, and iPad user, I got the $100 version and it is some of the best $100 I’ve ever spent in the computer world. With this level I can take HD Home Video, Time Warner Recorded TV (via Windows Media Center) or captured VCR tapes and create compilation DVDs or convert them for playback on the Android phone or iPad. There are other products for doing these actions, but they are all extremely slow and are difficult to work with.
Here is one of my videos from this camera, uploaded using the method described:


